Quick instructions
| Sivusto: | TestiMoodle TUNI |
| Kurssi: | TestiMoodle TUNI |
| Kirja: | Quick instructions |
| Tulostanut: | |
| Tulostettu: | lauantai 20. kesäkuuta 2026, 19.29 |
Sisällysluettelo
- 1. What is Moodle?
- 2. Frequently asked questions
- 3. Login
- 4. Dashboard and navigation
- 5. Instructions for students in a nutshell
- 6. Quick guide for teachers
- 6.1. Create new course
- 6.2. Sisu and TUNI Moodle
- 6.3. Course templates (Kickstart format)
- 6.4. Copy course (import)
- 6.5. Student access to the course
- 6.6. Create groups
- 6.7. Managing tools
- 6.8. Add / remove participants
- 6.9. Add / delete blocks
- 6.10. Add / edit content
- 6.11. Set enrolment key
- 6.12. Allow enrolment without key
- 6.13. Publish / hide course
- 6.14. Delete course
- 6.15. Automatic course deletion process
- 6.16. Add background image
- 6.17. Export and save grades and activity
- 6.18. Additional help and tips
- 7. Instructions for activities
- 8. How to order special Moodle accounts?
- 9. Turnitin instructions
- 10. Mobile app
1. What is Moodle?
Moodle is a LMS (learning management system) where teachers can create course areas. Typically Moodle course area is like a course's home page that can contain materials, links, assignments and other activities. All staff members and students at Tampere universities can access TUNI Moodle.
Android and iOS app for Moodle are available from official app stores (Mobile app instructions).
Navigate this guide by selecting a page from the menu right side or just go forward to the next chapter by clicking the arrow on bottom right
Moodle version
TUNI Moodle uses Moodle long term support versions. Current version is Moodle 3.5 LTS.
2. Frequently asked questions
- Login and credentials
- I can't login to TUNI Moodle?
- I forgot my password?
- I got “error/Unable to obtain session lock” error and can't use Moodle?
- Can I add external users to Moodle course?
- Course management (asked by student)
- How can I unenroll from course or hide unnecessary courses (asked by student)?
- I can't find course X (asked by student)?
- Create new course and course management (asked by teacher)
- I need new course?
- I can't find user X from Moodle?
- Could you add user X to Moodle course?
- How can I delete my old or unnecessary course (asked by teacher)?
- I can't find course X (asked by teacher)?
- Course materials (asked by teacher)
- How to copy course contents from old to new course?
- How to add new sections/topics to course?
- How to add link to course?
- How to add video to course?
- How to add very big files to course?
- How to add lecture recording to course?
- Sisu and TUNI Moodle
Login and credentials
I can't login to TUNI Moodle?
There are three different login methods available. Verify that you have selected correct one:
https://moodle.tuni.fi/login
Instructions: Login and reset forgotten password
https://tunidev.mmg.fi/mod/book/view.php?id=1726&chapterid=227
I forgot my password??
If you are an external user who has received a separate Moodle account. For example if you are participating continuing education courses. Reset your forgotten password here:
https://moodle.tuni.fi/login/forgot_password.php
If you have Tampere universities TUNI account (account ending with @tuni.fi), reset your forgotten password here:
https://salasana.tuni.fi
I got “error/Unable to obtain session lock” error and can't use Moodle?
Clear your browser cookies.
E.g. in Chrome browser:
https://support.google.com/chrome/answer/95647?co=GENIE.Platform%3DDesktop&hl=en
If you are an experienced user, you can also locate only "moodle.tuni.fi" site spesific cookies and delete only those.
E.g. in Chrome browser:
https://support.google.com/chrome/answer/95647?co=GENIE.Platform%3DDesktop&hl=en
Can I add external users to Moodle course?
Users with user account of another Finnish University can login to TUNI Moodle through HAKA login:
https://moodle.tuni.fi/login
You can order special Moodle accounts to TUNI Moodle for other external users.
Instructions: How to order special Moodle accounts?
https://tunidev.mmg.fi/mod/book/view.php?id=1726&chapterid=248
Course management (asked by student)
How can I unenroll from course or hide unnecessary courses (asked by student)?
A) Tampere University students:
If your course has not started yet, cancel your enrolment in Sisu. Data/changes from Sisu to TUNI Moodle is updated once an hour. If course has already started and you can't cancel your enrolment anymore, contact Sisu support to abort your course.
Only if you have enrolled to Moodle course with enrolment key shared by teacher, you can also unenroll from course by yourself in Moodle:
Go to the course > Select cog wheel -menu (upper right corner) > Unenrol me from...
Courses in Moodle are visible for students as long as course's teacher keeps the course published.
Tip: You can hide unnecessary courses from Moodle dashboard by marking all important courses with a start and then:
https://moodle.tuni.fi/my > Show settings > Show favourites only
B) TAMK students:
If your course has not started yet, cancel your enrolment in Pakki and wait until the next day. If course has already started and you can't cancel your enrolment anymore, contact the teacher of the course to abort the course.
Only if you have enrolled to Moodle course with enrolment key shared by teacher, you can also unenroll from course by yourself in Moodle:
Go to the course > Select cog wheel -menu (upper right corner) > Unenrol me from...
Courses in Moodle are visible for students as long as course's teacher keeps the course published.
Tip: You can hide unnecessary courses from Moodle dashboard by marking all important courses with a start and then:
https://moodle.tuni.fi/my > Show settings > Show favourites only
I can't find course X (asked by student)?
It may be that the course exists and your are a student on the course, but the course is still hidden from students. If you suspect that the course should already be visible to students, contact course's teacher directly.
Not all courses use Moodle. If you are not sure, contact course's teacher directly and ask about learning environments used in the course.
Verify that you have enrolled to the course in Sisu (Tampere University) or Pakki (TAMK).
You can find all your Moodle courses from Moodle dashboard:
https://moodle.tuni.fi/my
If you have marked some courses as favourites and therefore all courses are not visible on Moodle dashboard:
Show settings > Number of courses to display > Always show all (top option)
Create new course and course management (asked by teacher)
I need new course?
Create new TUNI Moodle course here:
https://tunidev.mmg.fi/mod/page/view.php?id=1724
(Moodle dashboard: https://moodle.tuni.fi/my > Create new course)
I can't find user X from Moodle?
Moodle user profile is automaticall created when user logs in to Moodle first time. After that the user can be found from Moodle.
Ask the user to login to Moodle:
https://moodle.tuni.fi/login
After that you can find the user and e.g. add the user manually to your course.
If you need to add several users to your course, use enrolment key.
Instructions: Set enrolment key
https://tunidev.mmg.fi/mod/book/view.php?id=1726&chapterid=252
Students enrolled to Sisu implementation will be added to TUNI Moodle course if the TUNI Moodle course has been created in Sisu and teacher has confirmed the enrolments in Sisu.
Instructions: Sisu and TUNI Moodle
https://tunidev.mmg.fi/mod/book/view.php?id=1726&chapterid=220
Could you add user X to Moodle course?
Only course's teachers can add additional teachers and students to the course. IT Helpdesk can only add users to course if permission from your supervisor is provided.
If Moodle course has been created in Sisu (Tampere University) or Peppi (TAMK), add new users to the course through Sisu or Peppi.
Instructions: Sisu and TUNI Moodle
https://tunidev.mmg.fi/mod/book/view.php?id=1726&chapterid=220
How can I delete my old or unnecessary course (asked by teacher)?
You can move the course to trashbin if you are a teacher in the Moodle course. After the course has been moved to trashbin it will be available 30 days in trashbin and after that the course will be permanently deleted.
Instructions: Delete course
https://tunidev.mmg.fi/mod/book/view.php?id=1726&chapterid=236
I can't find course X (asked by teacher)?
You can find all your Moodle courses from Moodle dashboard:
https://moodle.tuni.fi/my
If you have marked some courses as favourites and therefore all courses are not visible on Moodle dashboard:
Show settings > Number of courses to display > Always show all (top option)
If the course is still missing, verify that you have created a Moodle course for your course implementation.
Instructions: Create new course
https://tunidev.mmg.fi/mod/page/view.php?id=1724
Course materials (asked by teacher)
How to copy course contents from old to new course?
If your old and new Moodle courses are in TUNI Moodle you can copy all or only some of the content from the old course to the new course.
Instructions: Copy course (import)
https://tunidev.mmg.fi/mod/book/view.php?id=1726&chapterid=249
How to add new sections/topics to course?
Turn editing on and click "Add topics" button located at the bottom of the course area.
How to add link to course?
Add "URL" resource to the course:
Turn editing on > Add an sctivity or resource > Select "URL"
Fill-in name and actual URL.
Of course you can also add links using Moodle's editor. E.g. add link into forum post or assignment description.
How to add video to course?
Add videos to video service first and then embed or link the videos from video service to Moodle. Do not upload video files directly to Moodle. For performance reasons, the maximum allowed file size in TUNI Moodle is 100 Mb.
Instructions: Uploading videos to Moodle course
https://intra.tuni.fi/en/handbook/2677/2743/10802?page=2742
More use case instructions: Educational, project and science videos
https://intra.tuni.fi/en/handbook/2677/2743/10802
How to add very big files to course?
For performance reasons, the maximum allowed file size in TUNI Moodle is 100 Mb.
Share very big files from Office 365 OneDrive and just add links to Moodle course. Sharing a folder and all files/subfolders in the shared folder is also possible.
If you are a teacher, you can, for example, paste the shared file link to a course page in Moodle. All students will be able to access/download the file without logging into OneDrive.
If you are a student, you can, for example, paste the shared file link to an assignment you return to Moodle. The teacher will be able to access/download the file without logging into OneDrive.
Instructions: Office 365 OneDrive: File sharing
https://sites.tuni.fi/digitaltoolkit/materials-and-presentations/office-365-onedrive-file-sharing/
If there is also a lot of student collaboration required in the course, consider using TUNI Groups (Office 365 Teams) as an additional service along Moodle course.
Instructions: Group working via Teams during large courses
https://sites.tuni.fi/digitaltoolkit/interaction-and-engagement/group-working-via-teams-during-large-courses/
How to add lecture recording to course?
The most common use cases:
A) The teacher wants to record a lecture as a review material for the students. The teacher wants to record it on a personal computer and publish it on Moodle.
Instructions: Training video created by the teacher on own computer
https://www.tuni.fi/it-services/handbook/2743/10802?page=9688
B) The teacher wants to record a lecture as a review material for the students. The teacher wants to use the recording equipment at the lecture room and publish the lecture on Moodle.
Instructions: Video services for events
https://intra.tuni.fi/en/handbook/2677/2743/2794?page=2738
Sisu and TUNI Moodle
I need many Moodle courses to one Sisu implementation?
You can create only one TUNI Moodle course for one Sisu implementation in Sisu. If you need more TUNI Moodle courses, you can create additional courses manually to "Other" category. Note that you must invite students to these courses with enrolment key or add students manually.
Instructions: Sisu and TUNI Moodle
https://tunidev.mmg.fi/mod/book/view.php?id=1726&chapterid=220
Why there are not any students in my Moodle course?
Students enrolled to Sisu implementation will be added to TUNI Moodle course if the TUNI Moodle course has been created in Sisu and teacher has confirmed the enrolments in Sisu. If "enrolment period with direct confirmation" setting is used in Sisu implementation, students will be added automatically to TUNI Moodle course.
If needed, students can be added manually or by enrolment key directly to TUNI Moodle course (e.g. external students without TUNI account).
Instructions: Sisu and TUNI Moodle
https://tunidev.mmg.fi/mod/book/view.php?id=1726&chapterid=220
Why there are students in my Moodle course who are not enrolled in Sisu implentation?
If there are unknown students in Moodle course who have not enrolled in Sisu check the following first:
Have you or other teacher in the course activated enrolment key in Moodle course? By default enrolment key is not activated in new Moodle courses.
Have you or other teacher in the course manually added students to Moodle course?
3. Login
Go to TUNI Moodle: moodle.tuni.fi
There are three login options: moodle.tuni.fi/login/
- Login with TUNI account
If you have Tampere universities user account. - Login with HAKA account
Login with a user account of another Finnish University. - Login with special Moodle account
External users who have received a separate Moodle account, for example if you are participating continuing education courses. If have forgotten your special Moodle account password, reset your password here.
(Teacher or other responsible person may order special Moodle accounts: How to order special Moodle accounts?)
Logout from Moodle by selecting your profile icon on top right > Log out
4. Dashboard and navigation
Dashboard
After login, you will be redirected to your dashboard page.
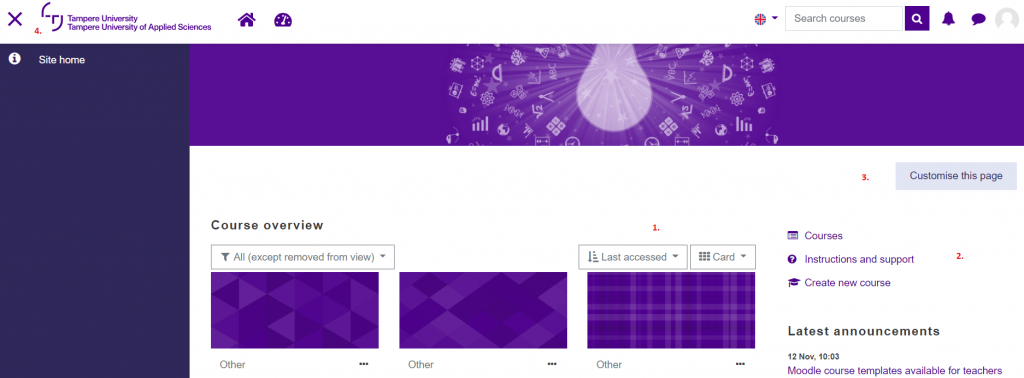
You can organise your course listing on your dashboard in different ways.
1. To view the course list in grid view with images, select Card as the display mode, or as a more concise list, select either List or Summary to display not only the course names but
also their descriptions. Change the view from the menu above the course names.
You can sort the courses alphabetically by name or by when you last accessed, to get the most active courses to the top of the list.
You can remove unnecessary courses from the view or star the courses you want from the menu you find by clicking the three dots next to the course name.
From the menu on the left, you can filter the view by selecting All (except removed from the view), In progress, Future, Past, Starred, or only the courses that were removed from the view.
2. Quick links to:
- Courses: all visible courses in TUNI Moodle
- Instructions and support
- Create new course (for teachers)
3. Customize this page: Customise your dashboard. You can e.g. add blocks to the dashboard or change the order of the blocks.
If you don't have Course overview block or your dashboard looks otherwise strange, please reset your dashboard:
Customize this page > Reset the page to default
4. From the cross, you can hide the sidebar and expand the view to full screen size.
Navigation (header area)

1. Open side menu (if you are in course area, e.g. table of contents will be shown here)
2. Back to the dashboard
3. List and select your courses quickly
4. Back to the current course's front page (icon is visible only if you are in course area)
5. Change Moodle language
6. Search courses
7. Open notifications menu
8. See the messages other Moodle users have sent to you
9. Open menu from which you can change preferences and see the Moodle calendar
5. Instructions for students in a nutshell
How do I log in to Moodle?
How do I join the course area?
How do I change a forgotten password?
My profile settings
Dasboard settings
How do I leave the course area?
How do I log in to Moodle?
You will find TUNI Moodle at moodle.tuni.fi.
There are three login methods in TUNI Moodle, which you will find on the page moodle.tuni.fi/login/.
Login with TUNI account
If
you are a student at Tampere University or Tampere University of Applied Sciences, log in with your TUNI account.
Login with HAKA account
If you are a student at another Finnish higher education institution, log in with
your own institution's account. Choose your own institution from the menu and log in with your own account.
NOTE! If you are a CampusOnline, FiTech or JOO student and have received a TUNI account, always use your TUNI account
in TUNI Moodle.
Login with special Moodle account
If you have been provided with a special Moodle account for logging into TUNI Moodle, log in with the account you received.
Log out of Moodle by clicking on your profile
icon in the upper right corner and selecting Log out from the menu that opens.
How do I join the course area?
Students are automatically enrolled to most courses based on confirmed registrations. You will see these courses on your dashboard when you are logged into Moodle.
Some courses may require registration with a key. If registration with
a key is enabled, you will receive a key from the teacher. The teacher can also give the address of the course area in connection with the key, but if you don't know the address, search for the course in Moodle by typing its code, name or part of
the name in the search field at the top of the page. Click on the name of the course from the search results, enter the enrolment key you received in the field and press the Enrol me button. Please note that the key must be written in the exact correct
format, taking into account upper and lower case letters. When you have registered with the key for the first time, the course will remain visible on your dashboard.
How do I change a forgotten password?
Change the password of your TUNI account (you will switch to another service)
Change the password of your special Moodle account
My profile settings
Edit your profile settings by clicking on the profile icon in the upper right corner. From the menu that opens, select Profile -> Edit profile.
How do I add a picture to my profile?
You can add a picture to your user profile. Click on the profile icon, select Profile -> Edit profile from the menu that opens and go to User picture on the page. Add an image in .jpg or .png file format from your computer to the server either via the file picker or by dragging and dropping and update profile. Please note that the maximum file size allowed in Moodle is 100 Mb and the image cannot be saved if it is larger than this. When saving, the image file is cut into a square and its size changes to 100 x 100 pixels.
Dasboard settings
When you log in to Moodle, you will be redirected to your dashboard page where you will see all your courses.
You can organize your course listing in the Course overview section in different ways.
To view the course list in grid view
with images, select Card as the display mode, or as a more concise list, select either List or Summary to display not only the course names but also their descriptions. Change the view from the menu above the course names.
You can sort the
courses alphabetically by name or by when you last accessed, to get the most active courses to the top of the list.
You can remove unnecessary courses from the view or star the courses you want from the menu you find by clicking the three dots
next to the course name.
From the menu on the left, you can filter the view by selecting All (except removed from the view), In progress, Future, Past, Starred, or only the courses that were removed from the view.
How do I leave the course area?
You can unenrol yourself from a course only if you have registered for the course with an enrolment key. In that case, you will find the unenrolment function in the function menu in the upper right corner (cogwheel icon).
If you are a student at
the Tampere University, you are able to cancel your registration in Sisu before the start of the study period, after which you will also be automatically removed from the Moodle course area within one hour. If the course is already running and you
are no longer able to cancel your registration in Sisu, contact Sisu support.
If you are a TAMK student, you can cancel your registration in Pakki before the start of the study period. If the course is already running and you can no longer
cancel the registration in Pakki, ask the teacher to remove your confirmed registration from Peppi, after which you will be automatically removed from the Moodle course area the next night as well.
Course areas are visible to students in Moodle
as long as the teacher keeps the course area published. However, on your Moodle dasboard, you can hide unnecessary course areas by removing them from your view. Select Remove from view behind the three dots. From the menu on the left, you can display
these course areas if you want, by selecting Removed from view.
6. Quick guide for teachers
- 6.1. Create new course
- 6.2. Sisu and TUNI Moodle
- 6.3. Course templates (Kickstart format)
- 6.4. Copy course (import)
- 6.5. Student access to the course
- 6.6. Create groups
- 6.7. Managing tools
- 6.8. Add / remove participants
- 6.9. Add / delete blocks
- 6.10. Add / edit content
- 6.11. Set enrolment key
- 6.12. Allow enrolment without key
- 6.13. Publish / hide course
- 6.14. Delete course
- 6.15. Add background image
- 6.16. Export and save grades and activity
- 6.17. Additional help and tips
6.1. Create new course
TAU: Course implementations
- Create new Moodle course in Sisu
Add "TUNI Moodle" classification to implementation in Sisu (more instructions).
TAMK: Course implementations
Teacher training school: Courses
Other courses: Create new course by yourself
- Create new course to 'Other' category
Staff members have 'course creator' permissions in 'Other' category.
If you are a staff member, but you do not yet have 'course creator' permissions: click here and login with your TUNI account to add permissions
6.2. Sisu and TUNI Moodle
Data/changes from Sisu to TUNI Moodle is updated once an hour (between xx:30 - xx:45)
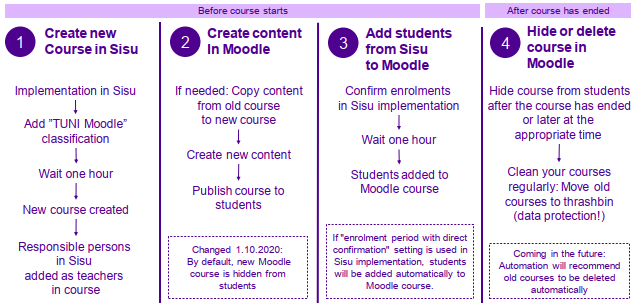
Create new TUNI Moodle course for Sisu implementation
- Login to Sisu: https://tuni.fi/sisu
- Select implementation from Sisu
- Implementation information -tab > Classification
- Edit
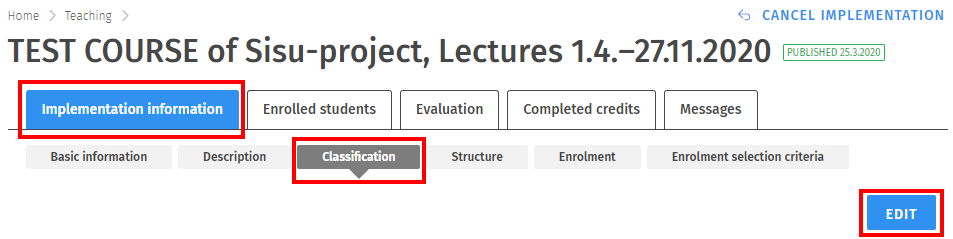
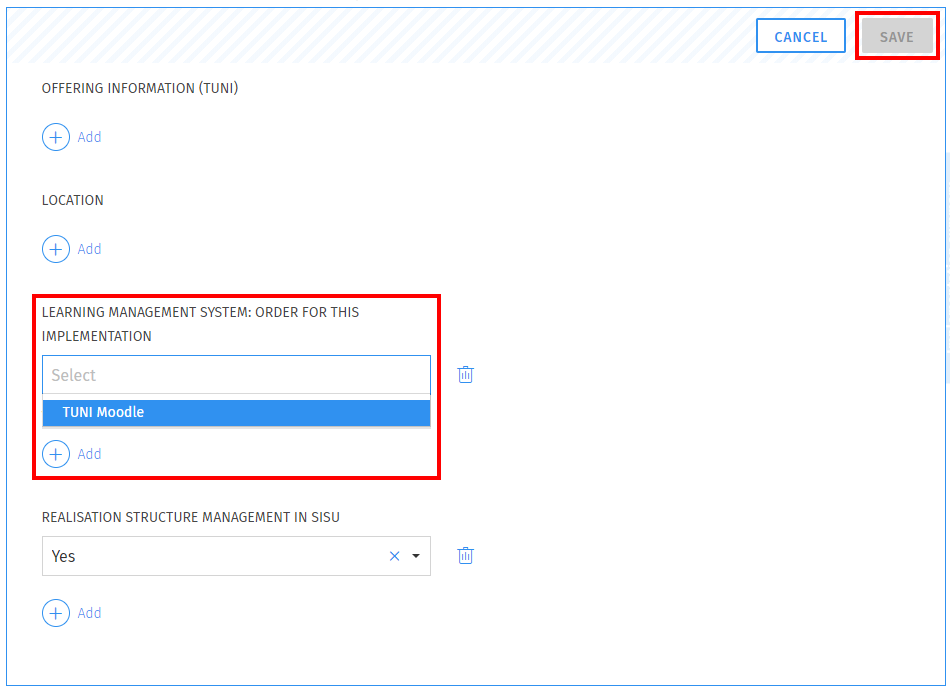
- Learning management system: Order for this implementation > Add > Select "TUNI Moodle"
- Save
After "TUNI Moodle" classification has been added, new TUNI Moodle course will be created to "Course implementations - TAU" category if all the following conditions are matched:
- Implementation end date is in the future in Sisu (implementation is ongoing or has not started yet)
- Implementation has at least one responsible teacher or teacher in Sisu
- Implementation language is set in Sisu
- Implementation name and name specifier are set in the same language as implementation language in Sisu
- Implementation is connected to course that has course code in Sisu
After the TUNI Moodle course has been created, all responsible teachers and teachers will also get an email notification about the new TUNI Moodle course.
All responsible teachers and teachers will be added automatically as teachers to the new TUNI Moodle course.
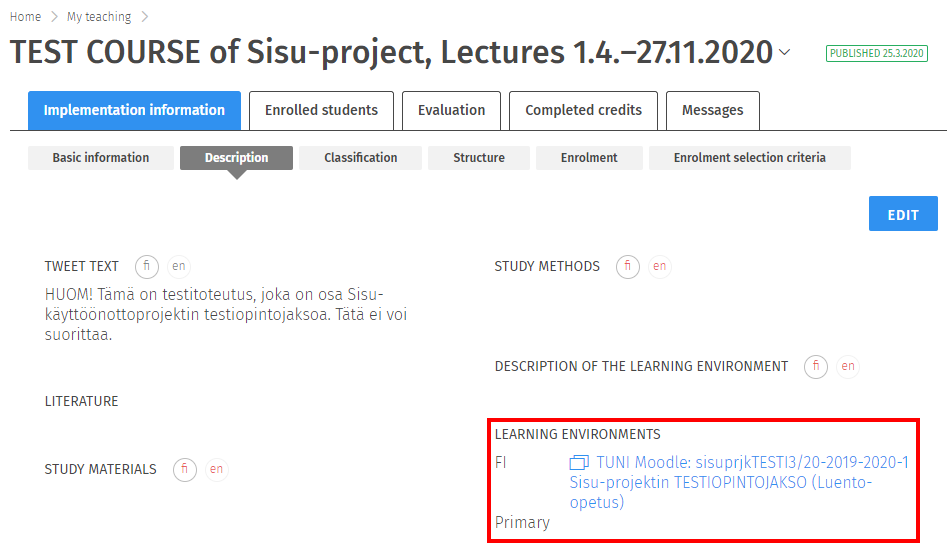
TUNI Moodle course name and link to the course are visible in Sisu implementation information: Description > Learning environments
By default, new Moodle course is hidden from students. Remember to publish Moodle course to students before the course begins.
You can create one TUNI Moodle course for one Sisu implementation in Sisu. If you need more TUNI Moodle courses, you can create additional courses manually to "Other" category. Note that you must invite students to these courses with enrolment key or add students manually.
Copy content from old course to the new course
If needed, you can copy content from your old existing TUNI Moodle course to the new empty TUNI Moodle course: Copy course (import)
Add teachers
If you add more responsible teachers or teachers in Sisu to the implementation, these users will be added automatically to TUNI Moodle course.
Remove teachers
If you remove responsible teachers or teachers in Sisu from the implementation, these users will not be removed from TUNI Moodle course or user roles will not be changed. This logic ensures that it's also possible to add teachers to TUNI Moodle courses directly from TUNI Moodle without Sisu (e.g. external users, not member of the Tampere University)
If teacher has been added to TUNI Moodle course from Sisu and afterwards teacher needs to be removed: Remove teacher first from Sisu implementation and then remove the teacher from TUNI Moodle course area or change role to student or non-editing teacher.
Add students
Students enrolled to Sisu implementation will be added to TUNI Moodle course if the TUNI Moodle course has been created in Sisu and teacher has confirmed the enrolments in Sisu. If "enrolment period with direct confirmation" setting is used in Sisu implementation, students will be added automatically to TUNI Moodle course.
If needed, students can be added manually or by enrolment key directly to TUNI Moodle course (e.g. external students without TUNI account).
Remove students
If student or teacher cancels student's enrolment in Sisu, the student will be automatically removed from TUNI Moodle course. Removing student directly from TUNI Moodle course will not work if the student has enrolled to the implentation in Sisu. Enrolments must be cancelled in Sisu.
Delete course
If TUNI Moodle course created from Sisu is not needed after all:
- Remove "TUNI Moodle" classification from Sisu implementation
- Remove link to "TUNI Moodle" course from Sisu implementation information
- Delete course from TUNI Moodle
6.3. Course templates (Kickstart format)
When you have created a new Moodle course in Sisu, Peppi, or manually and go to your course for the first time as a teacher, first choose how you will start building your course.
The following options are available:
- Choose one of the ready-made default templates to structure your own course.
- Copy one of your old courses as the basis for the new course.
- If you want to start from a completely empty course, go to editing the course settings and change the course format.
Option 1: Ready-made course template
The ready-made templates are
- Default template (Grid), which is specifically designed as the basis for large mass courses offered in contact teaching, but is also suitable for an online course. The template emphasizes visuality.
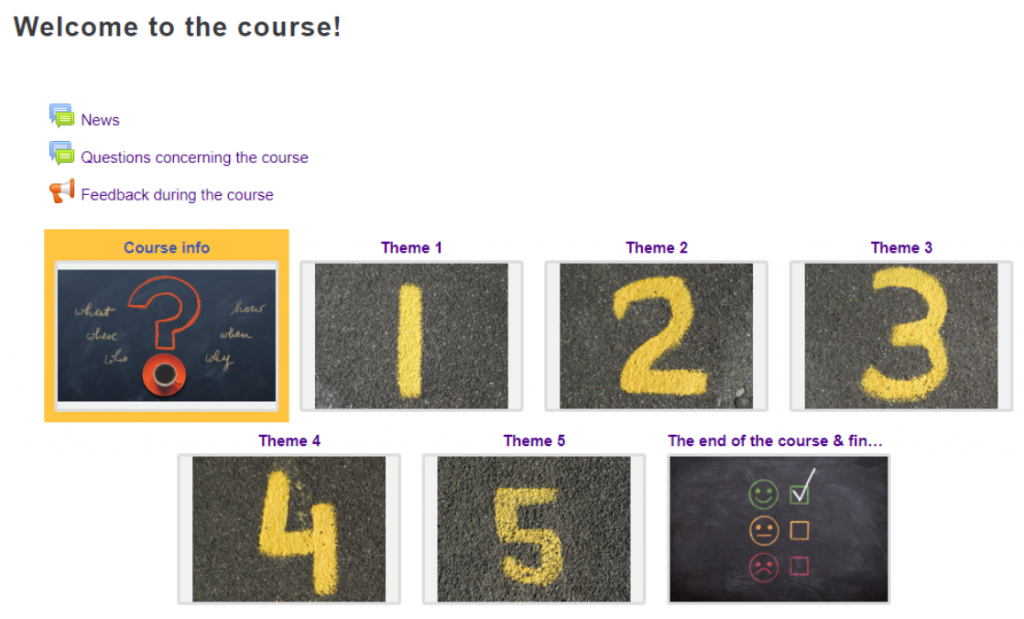.png)
- Default template (Collapsed topics), which is specifically designed as the basis for large mass courses offered in contact teaching, but is also suitable for an online course. The template is especially suitable for courses
with a lot of content.
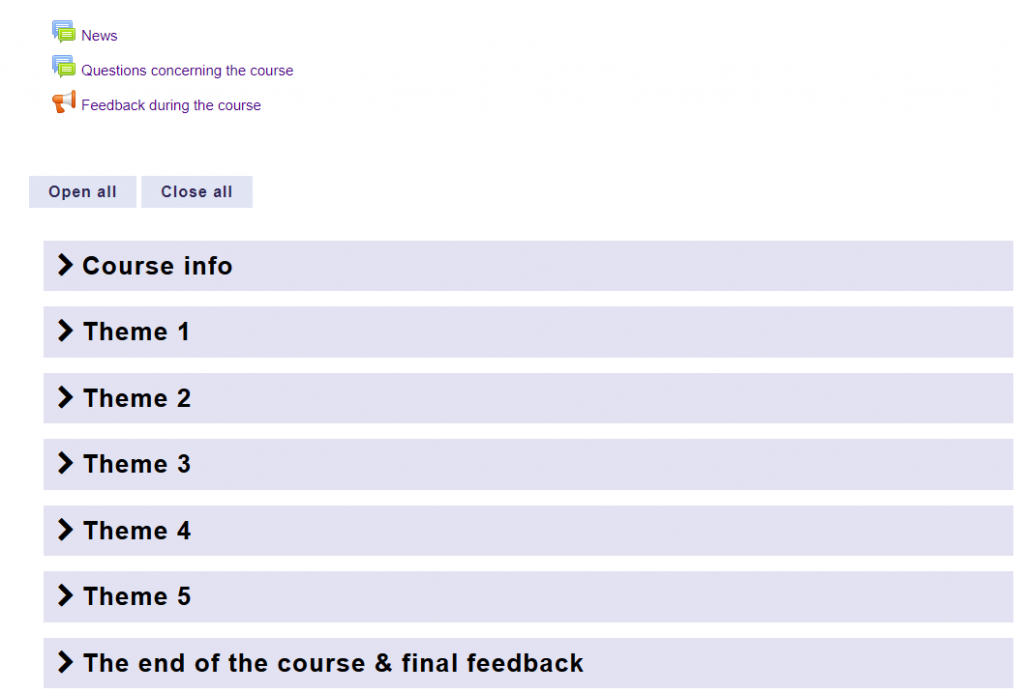.png)
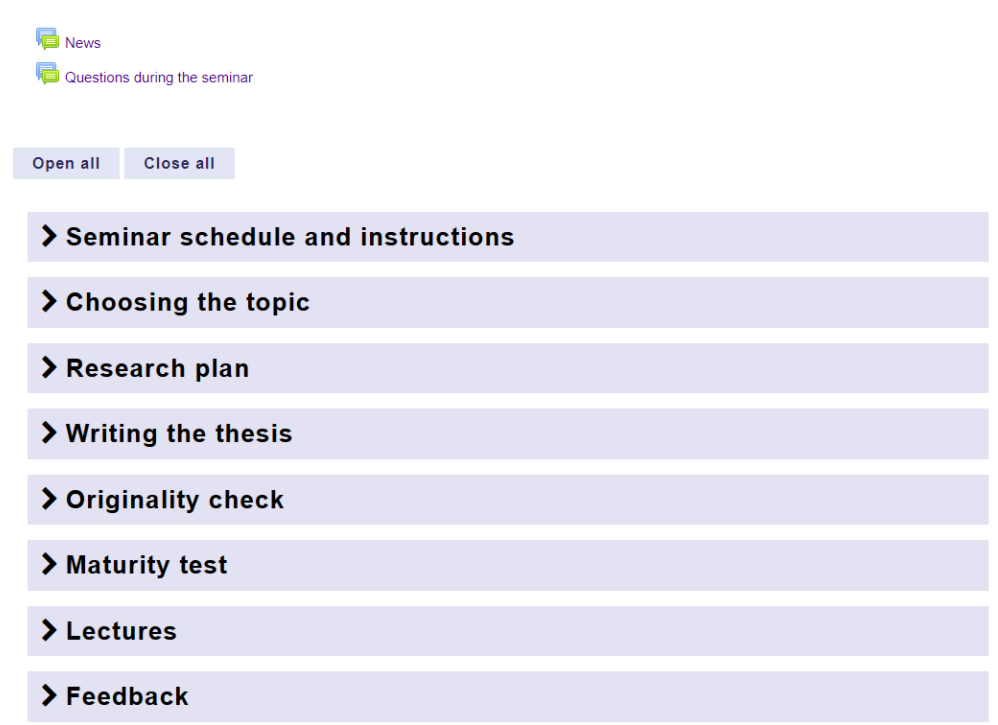
- Seminar, which is designed specifically for seminar-type and thesis courses.
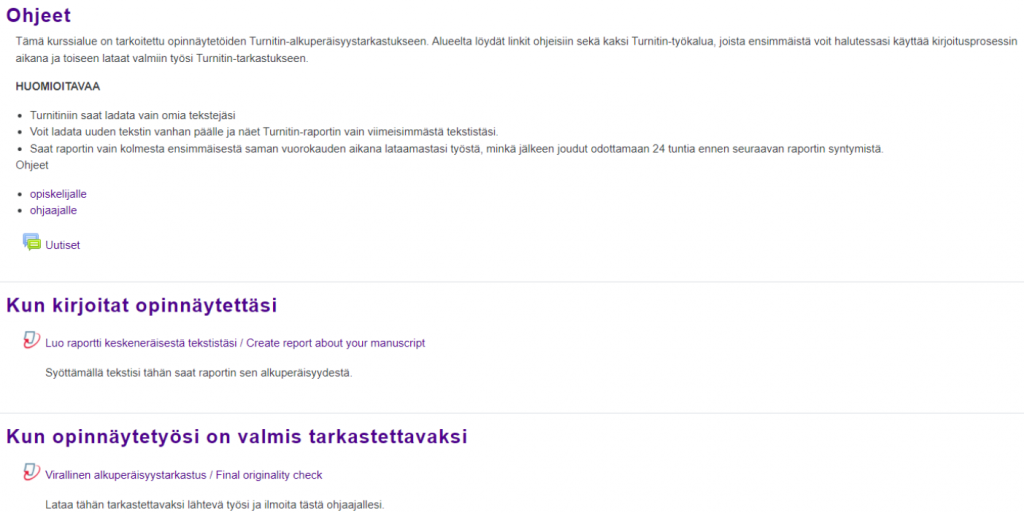
- Turnitin for thesis supervisors (the template is bilingual, you will see the texts in English if you use Moodle in English).
Once you have selected a template, first read its instructions. You will find a link to instructions in each template.
Option 2: Copy from an old course
On the page you will find a list of the courses you are teaching. Select a course from the list or search for it using the search function. If you use the search function, you will see the search results as you scroll down the page. Use the Import course button to copy the desired content from the course as the basis for a new course.Option 3: An empty course
To start building a course on a new blank basis, click the Edit course settings button on the right side of the page and select the desired course format from the settings.6.4. Copy course (import)
Copy contents from one course to another within TUNI Moodle
When you have created a new blank course area in Sisu, Peppi, or manually in the Other category, you can copy content to the new empty course from another course. You have to be a teacher on both courses - both the course you are copying from and the course you are copying to.
The copy includes course files, tools, and structure, but users or their activities (e.g. discussions and files they have uploaded) are NOT included in the copy.
- Go to your empty Moodle course
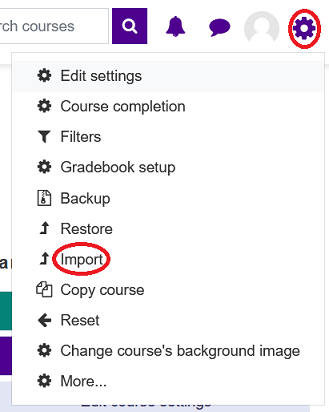
- Select from top menu > Import
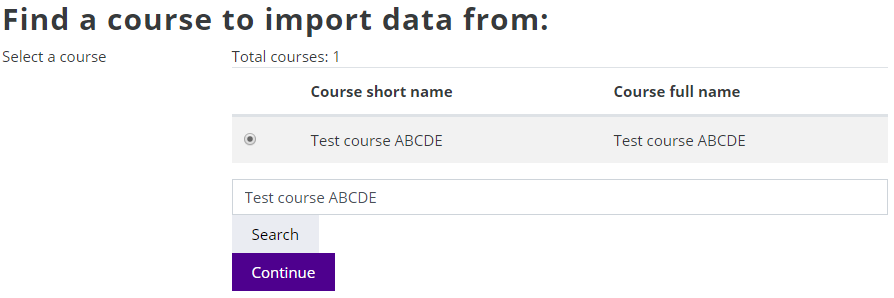
- Find your old course to import content from > Select the course > Continue
- On the following pages, select which activities you want to copy. NOTE! If there is a Turnitin tool in the area, it must not be copied. Each Turnitin tool must be created separately.
- Proceed from page to page with the Next buttons and finally press the Perform import button.
- You find the imported files and activities in the corresponding sections on the new course where they were in the old course.
- If the new course contains Panopto activities (linked videos)
setup a new link between the activity and video by clicking the
activity
6.5. Student access to the course
Students' access to the course is affected by how the course has been created and how the teacher hopes that students will enter the course:
1. The TUNI Moodle course has been created in Sisu (Tampere University) or Peppi (TAMK) and students enrol to Sisu or Peppi implementation
- Students will be automatically added to the course when teacher has confirmed the enrolments in Sisu or Peppi
- Teacher can also set enrolment key or enrol students manually
2. Teacher has manually created the TUNI Moodle course
- Students enrol themselves using the enrolment key
- Teacher allows enrolments without an enrolment key
- Teacher enrols students manually to the course
6.6. Create groups
By dividing students into groups, you can take advantage of the opportunity to work in groups on the course. Activities that support students’ work in groups include e.g. forum, database, wiki and OU blog.
The principle of the Moodle group function
is that the teacher first creates the groups and then uses the group division he/she has made in the activities of his/her choice. When the teacher decides to use groups in an activity, he/she also decides whether the students will work in closed
groups or whether they will be allowed to follow the work of other groups.
Create groups
To start creating groups, select from the action menu in the upper right corner of the course front page More ... -> Users -> Groups. You can create groups manually or auto-create them by using Moodle's automatic group creation feature. Students
must be enrolled on the course so as to add them in a group.
Create groups manually:
- Start creating a group with the "Create group" button.
- Name the group and save it.
- Select members of the group via the "Add / remove users" button.
Auto-create groups:
- Start creating groups with the "Auto-create groups" button.
- Select the group naming scheme: groups with names containing either letters or numbers. Press the question mark icon for instructions on selecting a naming scheme.
- Select whether the auto-creating of groups will be based on number of groups or members per group.
- By default, students are allocated into groups at random, but you can also use alphabetical order, for example.
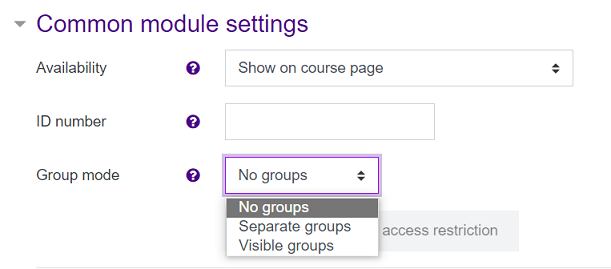
Set group mode for each activity
Once you have created groups, select whether to use groups in each individual activity. For example, the course may have forums that are common to all, as well as forums where students work in groups.
For example, if you want groups to work completely separately on a forum or wiki, without seeing each other's work, select "separate groups" as the group mode for the activity. If you want students to be able to follow the work of other groups as well, select "visible groups" as the group mode for the activity.
NOTE. If no groups have been created with Moodle's group creation function, the group mode of all activities must be "no groups".
6.7. Managing tools
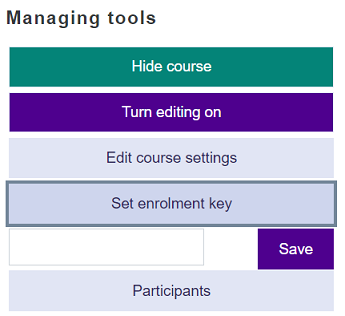
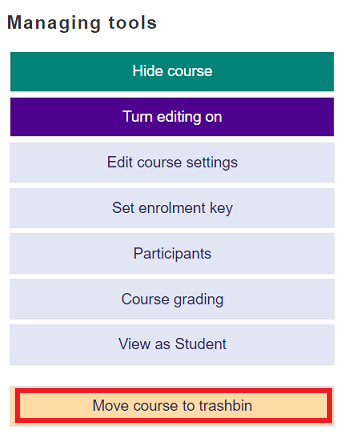
You find the most common settings on the right side of the course page under the Managing tools heading:
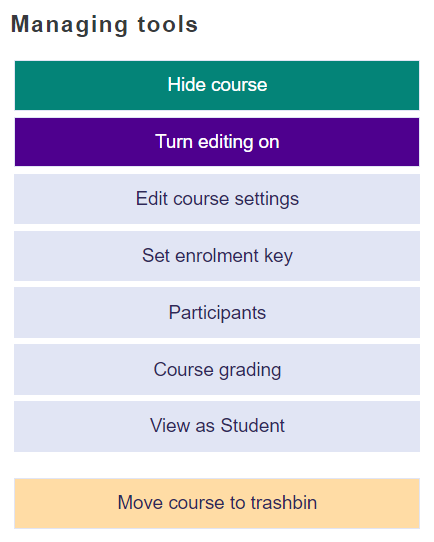
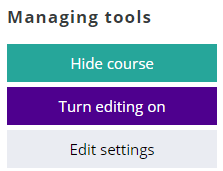
- Hide course / Show course: Here you can open your course to students. The color indicates whether the area is open or hidden: red = hidden or green = open.
- Turn editing on / Turn editing off: Displays the editing tools and allows you to add materials and tools to the area.
- Edit course settings: General information about the course, e.g. start and end times and course format.
- Set enrolment key / Check enrolment key: You can set a key that students will use to register themselves into your course. There is no need to set a course key if all students are automatically added to the course from Sisu or Peppi.
- Participants: You can view the list of participants in the area, add and remove participants, and change their roles.
- Course grading: You can view the gradebook of the course, where the grades you have given for the assignments and exams are stored.
- View as Student: You can view the course in student view.
- Move course to trashbin: To delete a course, move it to trashbin, where it will be permanently deleted after 30 days.
6.8. Add / remove participants
Students enrolled to Sisu (TAU) or Peppi (TAMK) implementation will be automatically added to TUNI Moodle course if the TUNI Moodle course has been created in Sisu (TAU) or Peppi (TAMK).
In other cases, it is recommended to primarily invite students to the course using the enrolment key or by allowing enrolment without the key. If you enrol students manually to the course they can't unenrol from the course.
Add participants
On the right side of the course you will find "Managing tools" and from there "Participants". On the Participants page, you can add users to the course in different roles, remove them from the course, and view and edit their roles.
Only a user who is already logged in to TUNI Moodle can be added to the course. If you are adding a participant to the course that Moodle cannot find, first ask him/her to log in to TUNI Moodle once.
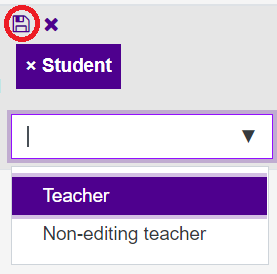
There is an "Enrol users" button at the top and bottom right of the page.
- Enter the name of the teacher or student you want to add in the field and click the name that appears.
- Select the role to which you want to add the user to your course: Teacher, Non-editing teacher, or Student.
- Click the "Enrol users" button.
Change the roles of participants

Remove participants from the course
If necessary, you can completely remove a user from the course by clicking the trash can icon in the last column.NOTE. This way, you can only remove a user whom you have added to the course manually or who has enrolled to the course with a key. Removing a student who has enrolled to the implentation in Sisu manually from the course does not permanently remove him/her from the course. Enrolment must always be cancelled in Sisu, after which the student will only be permanently removed from the course.

6.9. Add / delete blocks
If necessary, you can add blocks to the right edge of the course area, which can be auxiliary functions of the course or contain other additional information.
Are you not sure if blocks are needed, do not use them unnecessarily, as they will not show up at all in Moodle's mobile app, for example.
Add a block
- Turn editing on
- Add a new block from the left edge
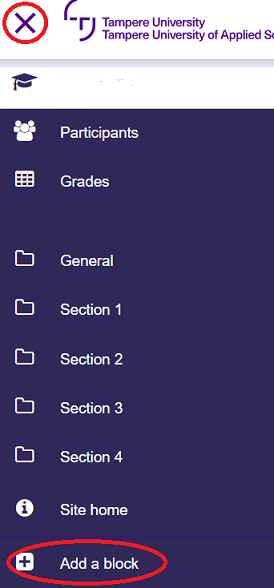
- Select a block from the list
Remove a block
- Turn editing on
- Select from the drop-down menu of the block: Delete block

6.10. Add / edit content
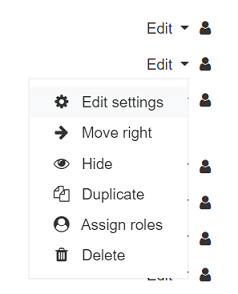
Edit activities on the course
- When the editing is on, you will see an Edit menu for each tool you have already added. Click the arrow to bring up a menu where you can, for example, edit, hide, duplicate and delete tools already on the course.
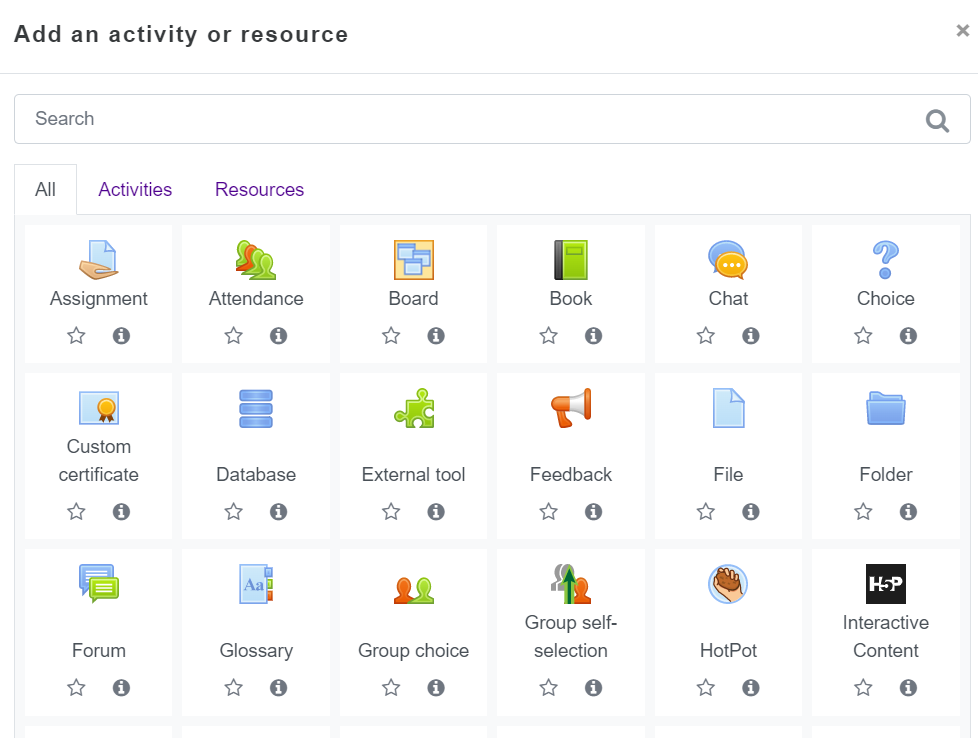
Add an activity or resource
- When the editing is on, you will see an "Add an activity or resource" link in each section, and by pushing the link you will get a list of all the tools available.
- Select a tool from the list.
- Find more instructions from the official Moodle documentation: Managing a Moodle course
6.11. Set enrolment key
Course enrolment key is not needed if TUNI Moodle course has been created in Sisu (Tampere University) or Peppi (TAMK) and students are enrolled to the implementation in Sisu or Peppi.
If TUNI Moodle course has been created manually to "Other" category:
- Set enrolment key and share the key and course URL to students (read more below)
- Allow all TUNI Moodle users to enrol without enrolment key
Set enrolment key
- Managing tools > Set enrolment key
- Enrolment key can be e.g. just a single word. You do not have to use numbers or special characters.
- After you have set the enrolment key, you can check what the key is by clicking: Managing tools > Check enrolment key
- Then you can publish the course area (show course) and share the enrolment key and URL to the course area, so students can enrol in course.
Delete enrolment key
- Managing tools > Check enrolment key
- Set empty enrolment key. If enrolment key is empty, users can't enrol in course area by themselves. If you want allow all TUNI Moodle users to enrol your course area without enrolment key, check instructions "Allow enrolment without key".
6.12. Allow enrolment without key
Self-enrolment without enrolment key is not needed if TUNI Moodle course has been created in Sisu (Tampere University) or Peppi (TAMK) and students are enrolled to the implementation in Sisu or Peppi.
If TUNI Moodle course has been created manually to "Other" category:
- Set enrolment key and share the key and course URL to students
- Allow all TUNI Moodle users to enrol without enrolment key (read more below)
Enable self-enrolment without enrolment key
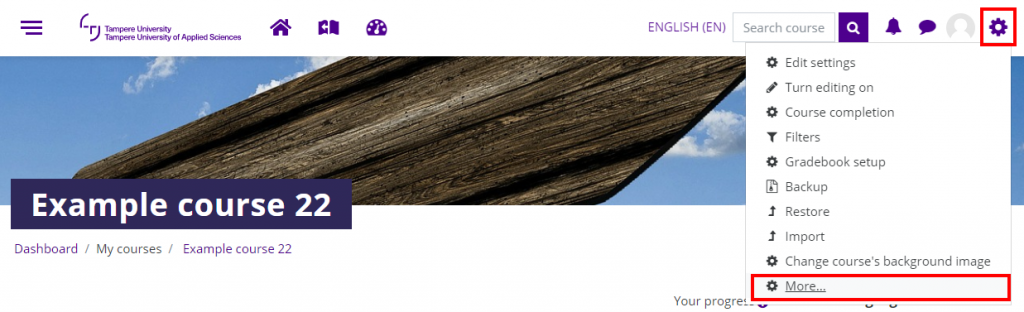
- Go to your course > Select from top menu > More
- Select: Users > Enrolment methods
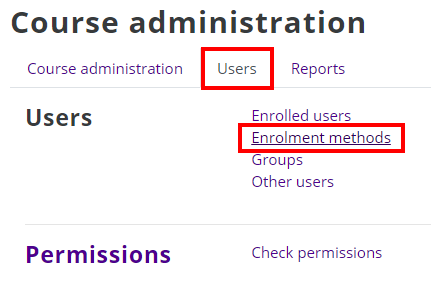
- Enable self-enrolment (Student) > Click closed eye icon
- If you need more advanced options > Click cog wheel icon next to eye icon
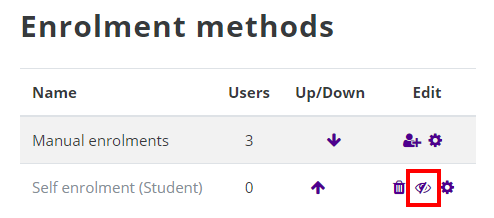
Now all TUNI Moodle users can enrol in course without enrolment key.
6.13. Publish / hide course
By default, course is visible only to the teachers specified in the course's enrolled users list. Students can't access the course until you publish the course.
Publish course from Managing tools: Show course.
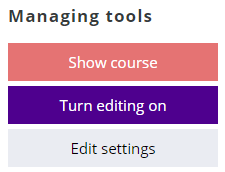
When the course is published (visible to students) the button is green.
You can hide the course from the Managing tools: Hide course.
It's important to hide the course after course has ended and students no longer need to access the course materials. By hiding the course old courses will not clutter students course lists. Hidden course and all student materials are still visible for all teachers on the course.
6.14. Delete course
According to the assessment rules of Tampere Universities, written or otherwise recorded assignments given and assessed to demonstrate competence must be retained for 6-12 months from the completion of the overall assessment of the course.
Teacher should delete courses with student data from Moodle if one year has been passed since the course has been actively used. For example it is over one year since the last assignment has been submitted or assessed.
If there are more than one teacher in the Moodle course, please verify from other teachers that the course can be deleted.
Move course to trashbin
Go to the course area -> Select from Managing tools -> Move course to trashbin.
After the course has been moved to trashbin it will be available 30 days in trashbin and after that the course will be permanently deleted.
If you accidentally moved a course to the trashbin, contact immediately IT Helpdesk (it-helpdesk@tuni.fi).
Copy course contents from course to be deleted to another course
Instructions: Copy course (import)
6.15. Automatic course deletion process
In January 2023, TUNI Moodle will introduce an automatic deletion process for unused courses. At first, there is only one deletion criteria: the course end date specified in the course settings. Later in Spring 2023, unused courses will be deleted based on the last time the course was visited. If you as course teacher want to avoid automatic deletion of a specific Moodle course, you need to do two things:
- Edit the course end date in the course settings, up to a maximum of 2-3 years in the future, or disable the end date altogether if you need the course longer. Do not select an end date of 2030, for example, because an end date far in the future will break Turnitin tasks, among other things.
- Visit the Moodle course pages at least once every two years.
If you have student role, you can't change course end date. Instead, please contact the course teacher.
If you receive an email from Moodle that your course has been moved to trashbin or your course was deleted:
- If it is less than a month since the course was moved to the trashbin: find the course in Moodle and restore it from the trashbin using Managing tools block's button "Restore from trashbin". Remember to edit the end date in the course settings.
- If it's been more than a month since the course was moved to the trashbin and you received a "course deleted" message: contact the IT Helpdesk, tell them the name of the course and ask them to restore it from the trashbin.
Reasons and a more detailed description of the removal process
The recommendation is to create a new Moodle course for each implementation of the course. This results in a large number of obsolete Moodle courses from past implementations that have not been used for a long time, and a large number of courses with the same name. It can be difficult for students to find the right courses. It therefore makes sense to regularly close and remove obsolete and unused courses in a centralised manner. This will also clarify the list of your own courses in Moodle.
According to the TAU and TAMK Information Management Plans, the retention period for student work is 6-12 months after the final assessment. After this period, student work should be deleted. Deleting outdated course areas will help to meet this requirement.
For the reasons mentioned above, an automatic deletion process for unused TUNI Moodle courses will be introduced in January 2023.
Courses with more than 12 months from the end date OR no visits for more than 24 months will be included in the automatic deletion process. Courses will not be deleted immediately, but teachers of the course will be informed by email. Teachers will receive two different messages at different stages of the deletion process. The stages of the process are:
- Step 1: If the course is open to students, it will be closed so that it will not be visible to students. The course is moved to the trashbin and teachers are notified by email. Teachers can still access the course and can restore the course to the original course category for a period of one month.
- Step 2: After one month, the Moodle course is moved to the hidden category and is also hidden from teachers. Moodle will send second email about course deletion. The restoring of the course must be requested from the IT Helpdesk within 11 months.
- Step 3: The Moodle course is deleted after 12 months from the start of the deletion process and it is no longer possible to restore the course.
Manual deletion of courses is still possible and recommended, as a teacher you can start the same deletion process using the Move course to trashbin function in the Managing tools block.
If you want to delete the student submissions but save the Moodle course content and assignments, first duplicate the assignment activity (Turn editing on > activity Edit menu > Duplicate) and then delete the original assignment activity. Note that deleting the activity will also delete the student submission and grading data from the Moodle grading book, so do this at the earliest 6 months after the final assessment. Deleted course content can be restored for 7 days in the course's own Recycle bin.
When a teacher creates a Moodle course in Peppi or Sisu, the end date of the course area is automatically set to the end date of the course implementation in Peppi/Sisu. If you create a course in the Moodle Other course category as staff member, the default end date is one year forward from the time of creation. As a teacher, you can edit the end date of the course 1-3 years in the future if necessary, or disable it in the case of a long term course or a custom base course from which you copy content to new courses each year.
The unused status of a Moodle course is determined from the Last access to course dates displayed in the participants list, based on the current participants in the course. Teachers' and students' visits are treated equally here. Persons who are no longer members of the course are not taken into account in this reasoning. It should also be noted that copying course content does not count as a visit, so you should visit and open your course pages at least once a year.
FAQ
1. What happens to the Panopto videos linked to my Moodle course during the removal process?
The Panopto course video folder created through the Moodle course or its videos are not automatically deleted at the same time as the Moodle course is deleted. However, permissions are automatically updated at different stages of the removal process:
- In step 1, students will lose viewing access to the Panopto folder and videos if the Share settings for the folder or videos have not been modified.
- In step 2, teachers will also lose all access to the course video folder and its videos, unless the teacher has separately added creator permission to himslef/herself in the folder's Share settings.
- In step 3, nothing happens to Panopto videos, they remain on the Panopto platform without permissions, i.e. only Panopto administrators can see them in Panopto, unless the default settings have been modified. Videos are removed from Panopto based on Panopto's own removal rules, see section "Panopto recordings lifecycle" on the page Panopto Video Service Instructions.
If
Panopto videos are allowed to be viewed anonymously with just a link,
such direct viewing links will continue to work after the Moodle course has been removed.
2. I have copied the contents and Panopto
videos of the Moodle course to be removed to the new Moodle course.
Will the removal of the old course affect the new Moodle course and
Panopto video copies?
In principle, it does not affect if the video
links in the new Moodle course are in the new Panopto folder. An exception
is if the video links made with standard Share video links are in the Panopto
folder of the old course even in the new course, and you have added
viewing rights for the students of the new course to the Share settings in the
old folder. In this case, for students in the new course, the video links will
work, but as a teacher, you may lose the creator rights to the video folder during
the process of deleting the old course. To avoid this, you should change
the standard Share links to Panopto LTI single video-type links in Moodle or separately
add creator permissions to yourself in the Share settings in the old folder. For
instructions on the different linking methods, see the IT instructions: Adding videos to Moodle course.
3. I can't find the Moodle course or
Panopto video folder I need as a teacher. What should I do?
First, log out of Moodle and then log in again.
In this way, you will restore the teacher role and permissions to the Moodle
course, where you may have used the function "Switch role to student". After this, make sure that no filters are applied to the course
listing in your Moodle dashboard view. It is also a good idea to search for a
lost course by course name and code using Moodle's course search function. If
the former do not help, contact IT Helpdesk.
4. Student: The old Moodle course disappeared, even though I still need
it. What should I do?
The teacher has either hidden the course from the students, or the automatic removal of the courses has done so. Contact the teacher of the course and ask him/her to publish the Moodle course back to students. Already during the implementation of the course, it is worth discussing with the teacher how long the students should retain access to the Moodle course. The default for automatic deletion is one year after the end of the implementation, but the teacher can extend the usage time by editing the end date of the course. The end date of the course is not visible to students.
6.16. Add background image
Open the Actions menu in the upper right corner of the course and select "Change course's background image".
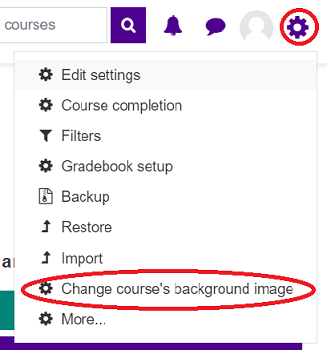
Add an image file from your device via the file picker or by dragging with the mouse.
Choose whether to display the image at the top of the page as a header or as a full page background.
However, the course background will not become a decorative picture of the course, so it will not appear in the course listing on your desktop.
6.17. Export and save grades and activity
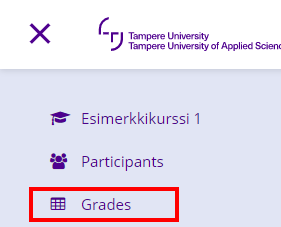
How to export and save participants' grades and other activity (submissions and other content) outside Moodle.Grades
Open from left menu -> Grades -> Export tab -> Excel spreadsheet -> Download
Activities
Activity actions and settings can be found from cogwheel menu.
![]()
Assignment
Open assignment -> Select cogwheel menu -> Download all submissions as a zip file.
Database
Open database -> Select cogwheel menu -> Export entries -> Select: 'Include user details' and 'Include time added/modified' -> Export entries
Database will be saved as CSV file that can be opened e.g. with Excel.Forum
To save all messages and comments at once is not possible. Copy messages or whole discussion threads manually and paste e.g. to Word document.
Glossary
Open glossary -> Select cogwheel menu -> Export entries -> Export entries to file
OU blog
Quiz
Open quiz -> Select cogwheel menu -> Results -> Grades -> Download table data as -> Microsoft Excel (.xlsx) -> Download
Wiki
To save all wiki pages and comments at once is not possible. Copy pages or comments manually and paste e.g. to Word document.
6.18. Additional help and tips
Additional help
Additional tips for advanced use cases
- Gradebook can help the teacher to automate course assessment
- Tracking progress and using activity completion can help the teacher and also the students to follow the progress of the course better
- Groups can help the teacher to give different assignments to different students in the same course
- Collapsed topics format can help to organize long course sections in large courses: Course administration > Edit settings > Course format > Collapsed Topics
7.1. Assignment
Do you wish that students submit their work, such as essays, reports or learning diarys only for the teacher to read and evaluate? Assignment is a suitable tool for this purpose.
The submitted assignment is only visible to the teacher, not for other students. If you want students to see each other's submissions for example for commenting, then select forum. Through the assignment activity, submissions can not be published for other students to be seen.
In the assignment, students submit the number of files permitted by the teacher or write a piece of text directly to an editor. The evaluation and feedback provided by the teacher is stored in the course area for a student to see.
7.2. Forum
Do you wish that students work with course themes by discussing them in one or small groups, or that they submit their work, for example, seminars or essays to read and comment on each other? Are you looking for support for student interaction or whether you want to offer them the opportunity to discuss and ask so that the discussion appears to everyone and everyone can participate in it? Forum is a suitable tool for these purposes.
You can create a number of forums for different purposes. The submission of students' papers on a forum makes it possible for students to read each other's papers and comment on them. If, on the other hand you want students' submissions only be visible to the teacher, then select assignment.
7.3. Wiki
Are you looking for a tool that is suitable for working in groups and as a tool for student co-writing or, for example, for creating learning diaries? You can use wiki for these purposes. You can create a common wiki for the entire course, wikis for groups, or personal wikis for students. The wiki can be edited by all students on the course if the course has one common wiki, or by all members of the group if the groups have their own wikis. You can build an entity that contains subpages, and students can also create subpages to the wiki. As a teacher, you can track student participation in group work using the version history of the wiki.
7.4. Workshop
Do you wish that students evaluate each other's submissions based on the evaluation criteria you defined, and that you can as a teacher to evaluate both the student's submission and peer evaluation? Workshop is a suitable tool for this purpose.
As a teacher, you can choose whether the peer evaluation is anonymous or not. The student does not see the work of other students than those who have been given to him/her to be evaluated unless you as a teacher separately publish students' submissions for everyone to see after the workshop has been closed.
Official Moodle documentation: Workshop
8. How to order special Moodle accounts?
You can order special Moodle accounts to TUNI Moodle for external users.
- Special Moodle accounts can be ordered by Tampere universities staff members
- There has to be a justified reason for the order: e.g. training event with external users as participants
- Special Moodle accounts are free of charge
- Special Moodle accounts are time-limited
- Special Moodle accounts can be ordered only for real persons who do not have any other account that can be used to login to TUNI Moodle
- Users with user account of another Finnish University can login to TUNI Moodle through HAKA login. Do not order an additional special Moodle account for these users.
- Consider if actual TUNI accounts are needed instead. Users will need TUNI account to access other Tampere universities electronic services.
- Special Moodle accounts cannot be merged with TUNI account later, so new employees should always wait for their actual TUNI accounts to be activated.
- Special Moodle accounts will be emailed to the user automatically when the account is created. Account creation or sending the email cannot be scheduled or postponed.
- Orders are generally processed within five working days (excluding holiday periods).
Order special Moodle accounts
Download this Excel file to fill in user details »
You do not have to enable macros in this file, macros are needed only by IT Helpdesk.
Required fields
- User's email address: Note that users with user account of another Finnish University can login to TUNI Moodle through HAKA login. Do not order an additional special Moodle account for these users.
- User's last name
- User's first name
- Default Moodle user interface language (Finnish or English)
- Responsible person (email address): For example your own email or other responsible person's email
Optional fields
- Account end date: If left empty, user account will be active one year. If user account has been inactive over one year, user account will be deleted.
- Course short name: If user should be added to course, check exact course short name from course settings
- User's role in course (if course short name is provided): student, teacher or non-editing teacher
Save and send this file
Send the file filled with user details to IT Helpdesk: it-helpdesk@tuni.fi
9.1. Turnitin instructions for supervisors (TAU)
Short instructions for supervisor taking the new Turnitin area into use:
1. You will see the new area once you sign in to TUNI Moodle. If you can't find your Turnitin area, please create a new one using Turnitin course template.
2. Open course area to students. Click Managing tools- Show course
3. Your students can access the area as follows:
- set the enrolment key and send it to your students, so they can enrol as users of your course area (Managing tools – Set enrolment key)
- OR select the students manually (Managing tools – Participants)
(If you can't find the student from Moodle users, please ask the student to log in to TUNI Moodle first)
4. There are two Turnitin tools available in the TUNI Moodle:
- Create report about your manuscript: Students can freely use this Turnitin tool while they are still writing their thesis.
- Final originality check: Once the student and supervisor agree that the thesis is finished, the student submits the thesis to this Turnitin tool. The supervisor reviews the originality report.
5. Bachelor’s degrees and master's degrees: If the supervisor serves as the thesis examiner, he or she will confirm that the thesis has undergone an originality check by making a note of it in the examination statement. Doctoral degrees: Inform faculty staff who coordinate the preparations ahead of the award of doctoral degrees of the required Turnitin originality check in accordance with the policy of your faculty.
Inquiries about Turnitin: it-helpdesk@tuni.fi
Please direct other questions about theses to educational administrators in your faculty.
9.2. Turnitin instructions for students
Quick guide for students: :
1. Each thesis supervisor has their own Turnitin area "Turnitin (Name of the supervisor)" in TUNI Moodle. The supervisor is responsible for adding students to his/her Turnitin area (Moodle course). The supervisor can give the students a course key, which the student can use to enroll the correct course. Supervisors can also enroll their own students directly in their course. In this case, the course is visible to the student as soon as he or she logs in to Moodle. If you do not see your supervisor's Turnitin area among your own courses in Moodle, please contact your thesis supervisor.
2. There are two Turnitin tools in the Moodle course:
- Create report about your manuscript: Students can use this Turnitin tool freely during the writing process to receive an originality report from draft versions.
- Final originality check: When the student and the supervisor agree that the work is complete, the student uploads his/her work to this Turnitin tool and the supervisor reviews the Turnitin report.
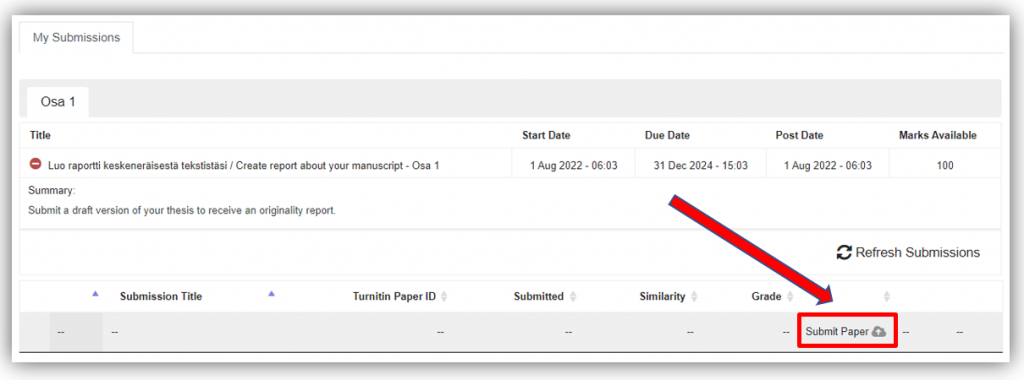
Submitting your own file to the Turnitin tool:
When you click on the Turnitin tool in the Moodle course, you will see date restrictions specified for the Turnitin tool on the page that opens. Below that is a row for your own submission. If you have not yet submitted any file to that tool, the row is empty, but on the right side of it you will see the "Submit Paper" text and an icon. Clicking that link you can upload your document file to Turnitin.
Please note that Turnitin generates only one report per day. After new submission you need to wait the report until next day.
9.3. How to add Turnitin activity to course
How to add Turnitin activity to course
On a Moodle course select ‘Managing tools’ and Turn ‘editing on’.
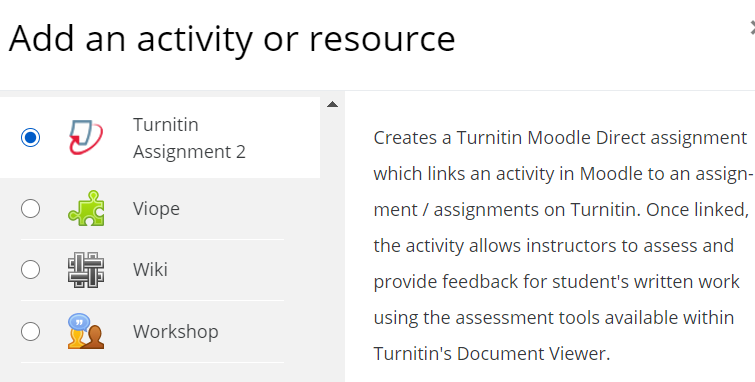
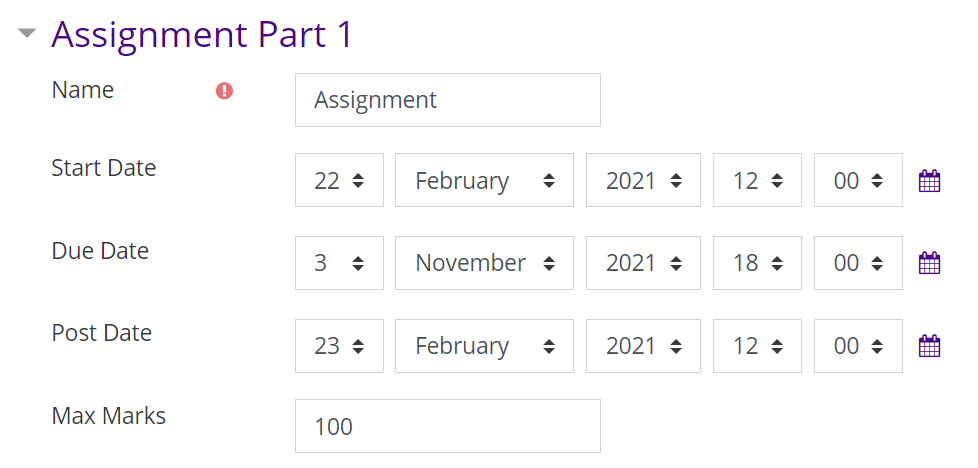
Select ‘Add an activity or resource’ and click Turnitin Assignment 2.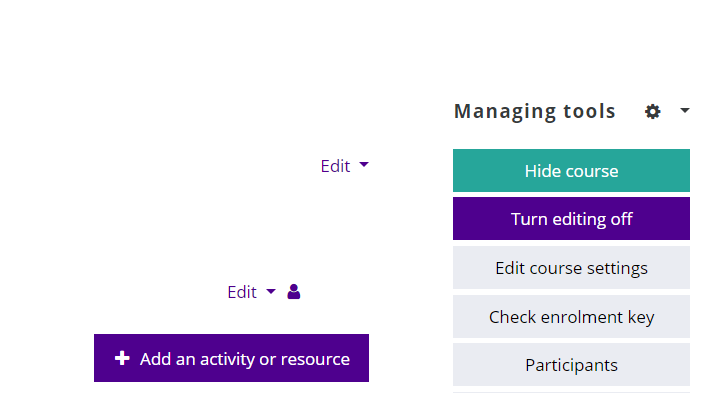
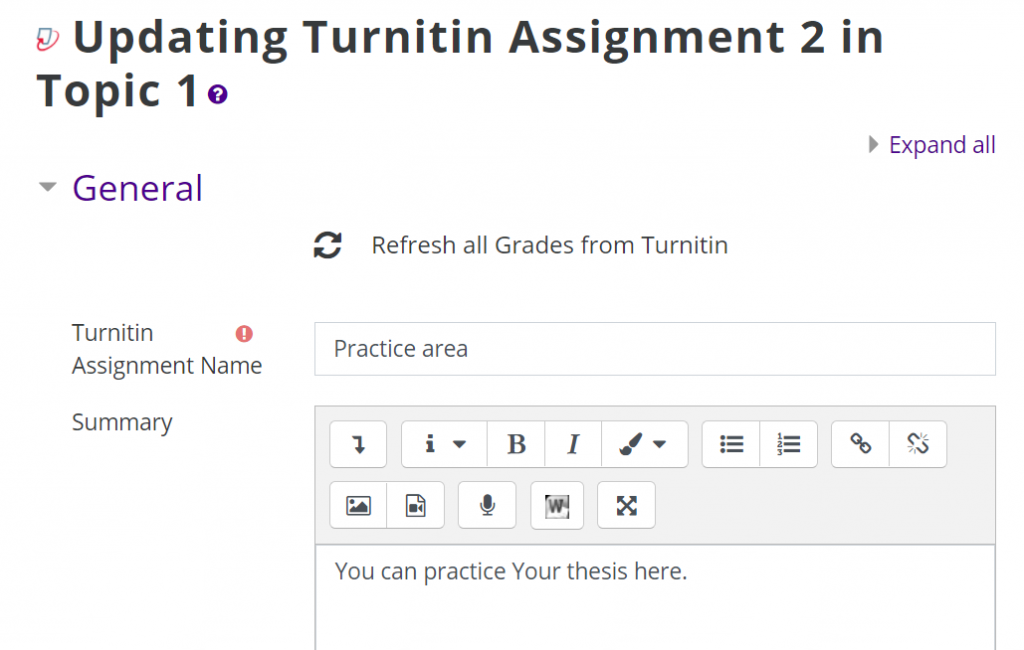
Note: ‘Post Date’ should be next day to Start Date, Students can see all increased comments.
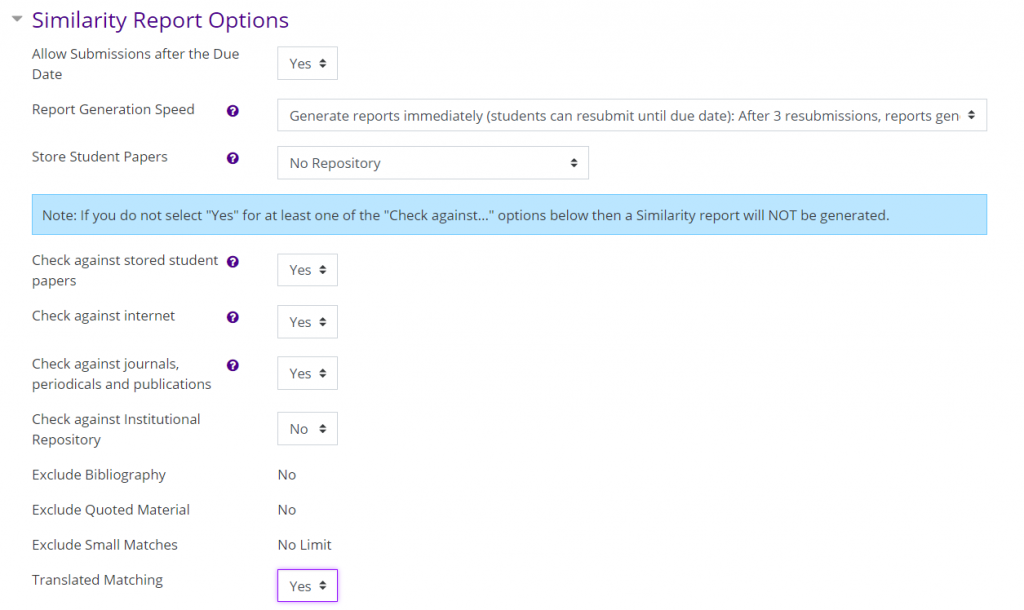
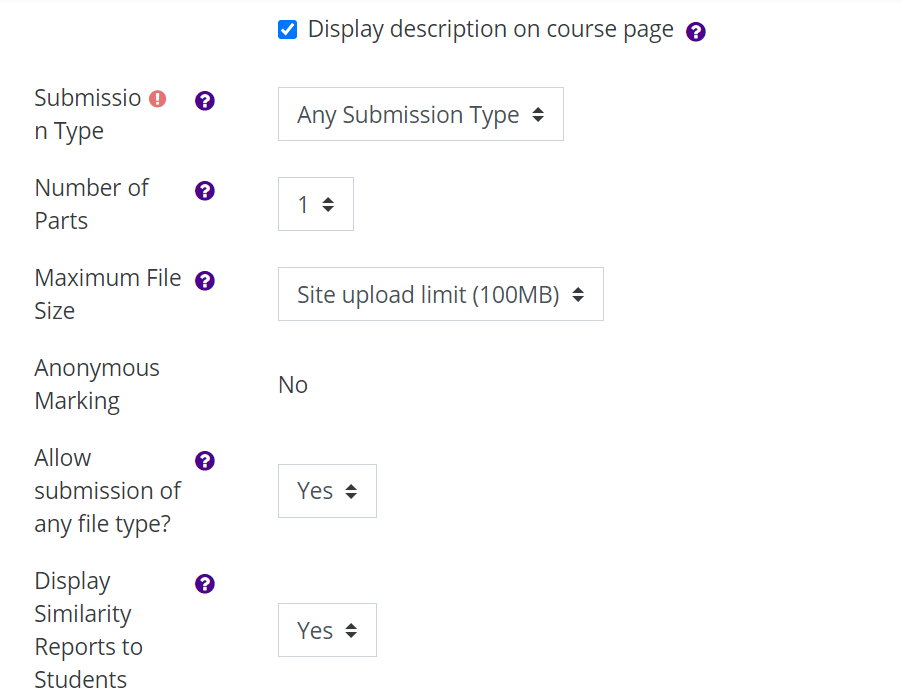
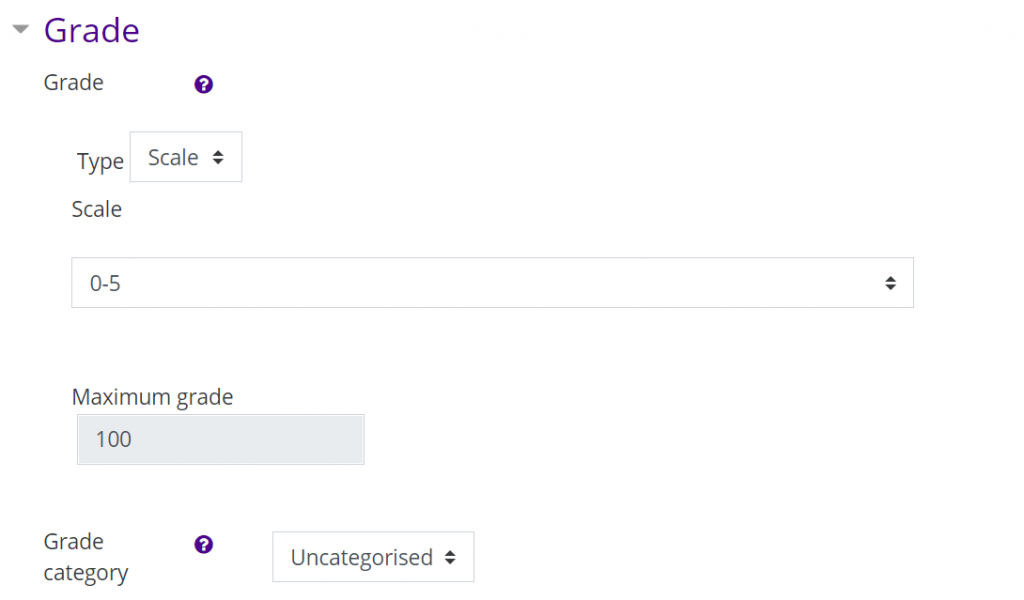
Warning! Select option ’Store Student Papers’ option ‘No Repository’ when using Turnitin in Practice Mode.
Final version Select option ‘Standard Repository’.
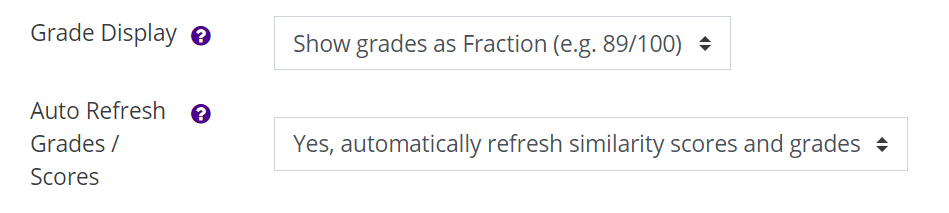
Rest of the Settings are fine.
And now You can add another Turnitin activity, name it for example Final Area, do almost the same choices but remember to choose ‘Store Student Papers’ option ‘Standard Repository’.
10. Mobile app
With Moodle app you can receive notifications from your Moodle course deadlines and other important events.
Download mobile app
Getting started
Start the mobile app and add a new site: moodle.tuni.fi
Login page to TUNI Moodle opens in web browser and after login the app starts automatically.
Your Moodle app is now set but you may wish to synchronize the information. This you can do by clicking the three horizontal lines from the bottom right corner and then choose “Preferences”. On the list the last option is “Synchronize now” and after clicking that your app is fully set to go.
Notifications
By default, notifications from course activities are disabled in the mobile app. You can modify notification preferences from your Moodle user profile preferences.
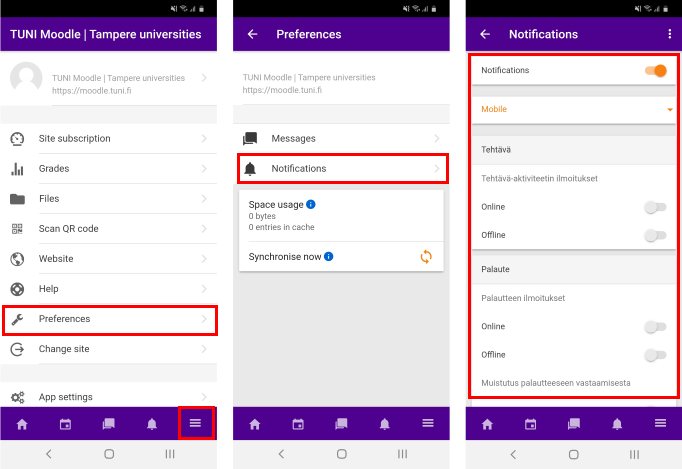
Mobile:
On mobile devices you can find your own Moodle profile by clicking the three horizontal lines (hamburger menu) from the bottom right corner of the screen. You can then choose “Preferences” from your own profile, and then “Notifications”. From here you can edit your own notification settings in your own preferred way.
At least the following notifications are often useful: Feedback, Forum, Lesson and Assignments.
If you wish to turn all notifications on/off, you can turn the uppermost slider “Notifications” from orange/grey. You can also choose if you want to get the notifications to your mobile, to your email or as a popup window.
Computer:
On desktop browser you can find your own Moodle profile from the top right corner by clicking your own profile picture or your initials. After this you can choose “Preferences” from the dropdown menu and then finally open the “Notification preferences”.